
We asked Claude Code to put a different editing effect on almost every line of a 45-second talking video. One word stayed locked in the center while 14 documents flashed behind it in under a second. Later the room faded out and a white outline traced the speaker. Nobody opened an editing app.
Here are 15 of those effects, what each one is for, and the exact prompt to give Claude. You need a paid Claude plan, a few free tools and a video that is already cut. You do not need to code or know motion design.
Short answer: Claude Code can build many popular editing effects on your own footage. It designs each one as an animated web page, renders it with the free tool HyperFrames, uses Blender for 3D and Robust Video Matting for cut-outs, and stacks the layers frame by frame. You describe the effect in plain English and approve a preview.
- Text match cuts, kinetic type, mockups and sliders need only HyperFrames and your transcript's word times.
- Text behind subject, outlines and silhouette wipes also need a cut-out of you, with no green screen.
- The tools are free. Claude Code needs a paid Claude plan, from $20 a month.
- Approve 8 stills and a short motion test before the full render.
How Claude builds an effect
Claude builds each effect as layers and combines them one frame at a time. Our stack ran, from the back: a warm white background, the footage, an animation layer, the speaker's cut-out laid back on top, then a front layer for documents, screens, type and captions. A word placed between the background and the cut-out sits behind your head. Each effect is timed from the word times in your transcript, so it starts on its word.
Before you start
- A paid Claude plan. Claude Code comes with Pro ($20 a month, or $17 a month billed yearly) and the higher plans. The free plan does not include it. See Claude's pricing.
- Claude Code, in the Claude desktop app (switch to Code) or in your terminal.
- HyperFrames, made by HeyGen, turns HTML animation into video by rendering each page frame by frame in a hidden Chrome browser. It needs Node.js 22 or newer and FFmpeg, which Claude can install. Its catalog has about 450 ready-made blocks and components.
- Blender, the free and open source 3D app coordinated by the Blender Foundation, only for 3D shots. Claude drives it through its Python API.
- Robust Video Matting (RVM), by Shanchuan Lin, Linjie Yang, Imran Saleemi and Soumyadip Sengupta, only for cut-out effects. It cuts a person out of every frame without a green screen. A graphics card makes it and Blender much faster.
- Time. Our effects pass took Claude a little over two hours from brief to checked file, on top of a finished cut.
Step 1: Start from a clean cut
Effects go on last, so start with a finished cut and a transcript with a time on every word. If you only have a raw recording, open Claude Code in the folder that holds it and paste this:
I want you to edit my talking video. Here is the raw file: [add your video file here]
1. Turn every word I say into text, with the time of each word.
2. If I said a line more than once, keep the best take. Pick the one with no stumbles, nothing cut off, and where I look at the camera. Cut every mistake, filler word and long pause.
3. Clean my voice. Remove the echo and the room noise.
4. Add captions that match my words exactly, a few words at a time. Never put them over my face.
5. Add an animation for each line that shows what I am saying.
6. Export it as a vertical 9:16 video, 1080 by 1920.
Before you start, tell me which tools you need and help me install them. Show me which takes you kept before you make the final video.Prefer a one-click copy? The same prompt is on our free prompt page, with every tool it uses.
What you should see: the takes Claude kept, then a 1080 by 1920 video with captions. Keep the transcript, because every effect below uses its word times.
Step 2: Add HyperFrames and lock one look
- Install HyperFrames with the two commands below, in your terminal or by asking Claude to run them. The skill then shows up in Claude Code as /hyperframes:hyperframes.
- Pick one look for the whole video: one background, one font family, one accent color and one corner style. We used warm white with a fine dot grid, white rounded panels, one sans-serif font with no italics and an orange accent, #D97757. Fifteen effects in fifteen different styles would look like a template pack.
claude plugin marketplace add heygen-com/hyperframes
claude plugin install hyperframes@hyperframesUsing HyperFrames, set one look for every effect and save it as a style file: background [warm white, fine dot grid], one font [name] with no italics, one accent color [#D97757], white rounded panels with soft shadows.
Keep my footage in natural color, with no grain, glitch or filter on my face.
Show me one still with a panel, a headline and a caption before you build anything else.Step 3: Give every line its own effect
The rule behind our edit: one effect per line, shown while the line is spoken, and no effect used twice. Get a beat sheet first, so you can swap a weak idea while it is still text.
Read the transcript and make a beat sheet. For each line, give the words with their start and end times, one effect that shows what the line says (pick from: [effect names]), and a sound for it that stays well under my voice.
Never repeat an effect. Never put anything over my face. Wait for my OK before you build.What you should see: one row per line. If one effect fills half the rows, ask for more variety.
Text effects
1. Text match cut
One word stays frozen in the same spot while the page around it changes every few frames, from a newspaper page to a receipt. This is a text match cut. Use it once, on the word you want remembered, like your topic in the first two seconds.
In our edit the word sat dead center at half the frame's width, in an orange highlight box. Fourteen documents swapped behind it, three frames each at first and one frame each by the end, with a soft click per swap. All 14 passed in under a second.
Using HyperFrames, make a text match cut on "[WORD]" when I say it.
Design 14 full-frame documents yourself (newspaper, terminal, email, chat, receipt, billboard), each bigger than the frame and full to the edges.
Put "[WORD]" at the same size and position on every one, dead center, in a highlight box.
Hold each for 3 frames, speeding up to 1 frame, with a soft click per swap.
Invented names only: no real publication names or logos, and only true or neutral text.Keep the pages close in brightness. Light and dark pages swapping fast will flash, and the W3C accessibility guideline says web content should not flash more than three times in any one second.
2. Text behind subject
A giant word sits behind your head, so you stand in front of the text. Save it for the one word a line hinges on, like EVERYTHING or FREE.
When I say "[word]", put [WORD] huge behind my head, with an RVM cut-out of me on top.
Bold and condensed. Pop the letters in one by one with a small overshoot, then hold to the end of the line.
Keep it short enough to read around my head.If the cut-out grabs a chair or lamp beside you, ask Claude to rerun RVM with a different downsample_ratio, the setting its docs say to adjust for each video. That cleared a chair smudge in one of our edits.
3. Kinetic typography
Kinetic typography is the technical name for moving text. Here each word of a short line flies in as you say it, then holds. It fits a punchy line of four to six words.
On "[line]", show each word big in the center as I say it, timed from the transcript.
Each word slides up from behind a mask with a slight tilt and a small overshoot.
Hide the normal captions during this line, so the words do not show twice.We used it on "It writes every caption", one word at a time. HyperFrames has a ready-made per-word-rise component for this.
Effects made from your own footage
4. White outline cut-out
The room fades away and a white line traces your body. Use it on a turning point, like the moment noise disappears from a voice. Claude grows your cut-out by a few pixels and paints only the new edge, so the line hugs your shape.
On "[line]", fade my background to our plain background in under half a second, keeping me in natural color.
Then pop a white outline around my body, about 10 pixels thick, with a slight bounce. Nothing goes over my face.On a line about isolating the voice, we also pulsed orange rings behind the speaker.
5. Silhouette mask wipe
Your cut-out grows from your face until it fills the frame, and the next scene appears inside it. It is a clean exit from a talking shot into a screen or a new section.
At the end of "[line]", use my cut-out as a mask. Scale it up from the middle of my face until it covers the frame, slow at first and then fast, and show the next scene inside it. Add one soft whoosh.We scaled the silhouette to about 12 times its size, starting slow and speeding up into the next scene.
6. Face cam bubble
The full frame shrinks into a round bubble in a corner, so a screen can take over while you stay in the story. It suits tutorials and product walkthroughs.
On "[line]", shrink my full frame into a round face cam bubble in the bottom left, with a white ring.
For the bubble, cut an exact square from the original footage around my head, with a little space above my hair. Never squeeze a tall crop into the circle.
Keep the bubble above every other layer.That middle line comes from our own mistake: the first bubble squeezed a tall crop into the circle and made the face about 1.5 times too wide. A square cut from the 4K source, with about 13 percent headroom, fixed it.
7. Clone grid
Nine of your takes fill a three by three grid, a simple form of the clone effect, where copies of one person share the screen. A frame scans the tiles, the best take gets a ring, and the camera zooms into it.
On "[line]", show 9 of my real raw takes in a 3 by 3 grid of rounded tiles that pop in one by one.
A white frame moves across the tiles, one tick per tile. Ring the best take in our accent color, dim the rest, then zoom into it until it fills the frame.Use real, different takes. Our nine came straight from the raw file.
8. Punch-in zoom
The frame jumps closer on one word, then eases back a little. Use it on the word you would say louder, like "mistakes" or "never".
On "[word]", punch in on my face by about 12 percent in 0.15 seconds with a fast ease-out, then ease back a little.
On the next word I stress, punch in again by about half as much.
Optional: slice the word [WORD] with a thin cut line as it appears.Those are the numbers from our edit, where the word MISTAKES also got sliced by a cut line.
Screen and interface effects
9. Device mockup with a typing cursor
Your words become an app screen inside a clean window or phone frame. Use it whenever you say "I typed" or "I asked". We split it into two shots: a recording card dragged into a tilted window, then a punch-in on the prompt box as a prompt typed itself.
Using HyperFrames, design a simple app window (not a screenshot) in a white rounded frame.
Shot 1: a cursor drags a card with a frame of my video into a drop zone, with a light motion trail, as the camera pushes in.
Shot 2: cut close on the prompt box, type "[prompt]" with key ticks, and click send.
Start from the device-frame-stage, cursor-drag-drop and typed-prompt components.10. Zoom-through transition
The camera dives into one element on screen, like a button, and that element becomes the next scene. It lands best right after a click.
After the click on [element], zoom through it until its color fills the frame, then open the next scene through a shrinking ring of that color. Add one soft whoosh.In our edit the camera dove into an orange send button. HyperFrames' zoom-through-transition component is a good base.
11. Timeline ripple
A small timeline shows your clips, the mistakes pop out, and the kept clips slide together to close the gaps. It fits any line about cutting or fixing.
On "[line]", show a timeline card with my real clips as thumbnails over their waveforms, the mistakes in our accent color.
On "[word]", pop the mistakes out and hide them. Then slide the kept clips together and zoom to fit in one move: edge to edge, equal gaps, no overlaps.We hid each removed clip the moment it popped out, so nothing peeked from behind the kept clips, and left equal 10-pixel gaps.
12. Progress ring counter
A ring fills from 0 to 100 percent around a logo or number while short tasks tick off beside it. It shows a process finishing.
On "[line]", draw a progress ring around [logo or number] that fills from 0 to 100 percent, slow at both ends. Beside it, tick off 4 to 6 short tasks one by one, then show "Done".Start from the catalog's conic-progress-ring or count-up component.
Proof and depth effects
13. Before and after slider
A divider slides across the frame with the before on one side and the after on the other. Use it for any change you can show, like a cleaned voice or a color grade. We ran it across a voice waveform, raw gray against clean orange, as the sound switched from the raw room to the clean voice.
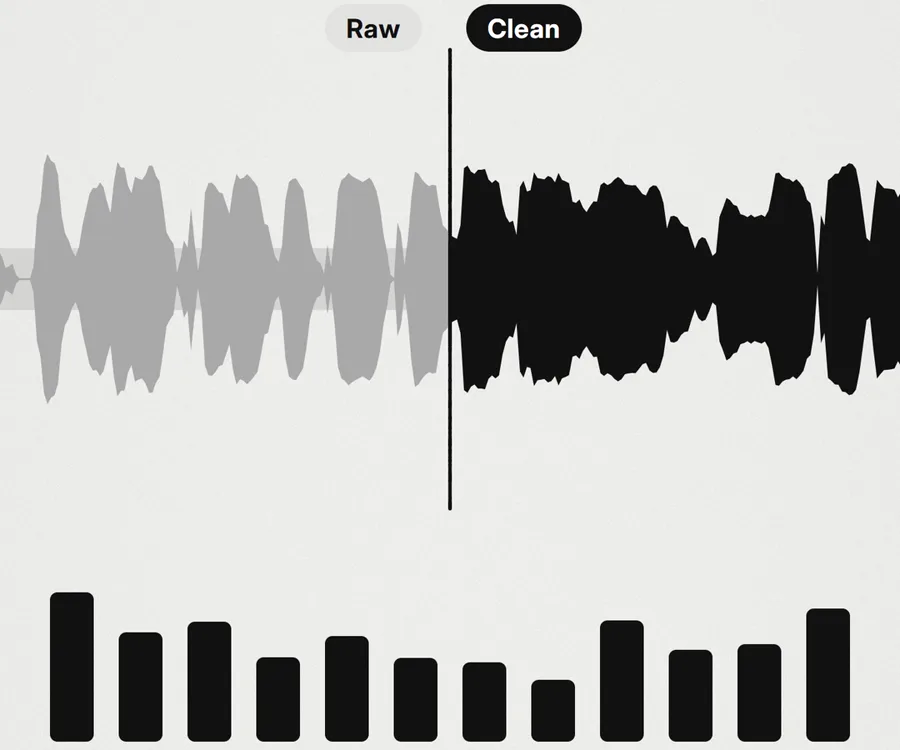
Using the HyperFrames before-after-wipe component, compare [before] and [after] on "[line]": before in gray on the left, after in our accent color on the right, a white divider between them.
Slide the divider across while I talk, and switch the sound from before to after as it moves.14. 3D hero shot
One shot in real 3D, with depth and soft shadows. Save it for one or two big lines, because 3D renders take time. We made two on a light set: timeline clips flying in and melting into a logo, and a voice drawn as a ring of 3D bars with orange caps.
Using Blender, make a 3D shot for "[line]", 1080 by 1920, about [2] seconds, on a clean light set with soft shadows and our accent color: [describe the object and its move].
Render 3 small test frames first and show me before the full render.Check the brand color on a rendered frame. Our first renders on the white set needed darker clips and a deeper orange before the logo read as the brand color.
15. Phone parallax
A phone flies in with its layers moving at slightly different speeds, then drops into place. Parallax moves the background slower than the foreground to suggest depth, a trick animators have used since the 1930s. Use it to bring in a reference or an example.
On "[line]", fly a phone in from the side showing [reference]. Move the screen, the phone and its shadow at slightly different speeds, then drop it into a card labelled "[Reference]".Step 4: Check stills and a motion test before the full render
Every fix after the full render means rendering again, so ask for a preview first:
Before the full render, make me a sheet of 8 stills, one per big effect, and a low-res motion test of about 12 seconds with the text match cut, one 3D shot and two transitions.
Check every scene at 10 frames a second or more: no half-drawn states, no broken 3D, no caption split across two words, nothing over my face.Judge the test in motion, since a still can look right while the easing feels slow. We went through two review rounds, and the second rebuilt the text match cut with denser documents.
After the render, have Claude check its own file. All 1,365 frames of ours decoded, a fresh transcript matched every line, no caption came closer than 248 pixels to the speaker's chin, and the loudest of 115 sound effects sat 19.3 dB under the voice.
Effects that make an edit look cheap
Our first attempt at this edit was dark and cinematic: glitch hits, RGB split, film grain, letterbox bars, film burns, flash frames and black and white footage. Our founder Allen's verdict:
"It shows that it has been done by an editor who knows a little bit of something but not all of it."
The rebuild dropped all of it and kept the footage in natural color. The rule for the motion was nothing linear and nothing that just fades: a small anticipation before each move, a slight overshoot, then a settle.
Costs, limits and other options
- HyperFrames, Blender and RVM are free. HyperFrames is Apache 2.0, and its makers say there are no per-render fees or commercial-use thresholds.
- Claude Code needs a paid plan. A long effects session uses a lot of your plan's usage, and Max gives five times Pro's usage if you edit often.
- Design your own documents and app screens, with no other company's name or logo on them.
- For one effect on one clip, a template can be quicker. CapCut's Text behind Subject template, for example, takes two 9:16 clips. Claude pays off when you want many effects in one look, on every video you post.
- Teams that already work in React can use Remotion. It is free for individuals and for companies with up to 3 employees, and larger companies need a company license.
If you would rather have a team build effects like these for your brand, that is part of our creative production work.
Frequently asked questions
What are AI video editing effects?
They are effects an AI makes or builds for you. Some come from video models that change the picture itself, like making an object inflate or squish. Others are motion graphics built on your real footage, such as a text match cut, text behind subject or a before and after slider. Claude Code builds the second kind: it designs each effect, renders it and layers it over your video.
What is a text match cut?
A text match cut keeps one word in the same spot on screen while the page around it changes every few frames, for example from a newspaper page to an email. It works best once, on the word you want viewers to remember, such as your topic in the first two seconds.
How do you put text behind a person without a green screen?
Cut the person out of every frame with a matting model such as Robust Video Matting, then stack the layers in order: the background, the text, and the cut-out of the person on top. Claude Code can run the cut-out and build the text layer with HyperFrames from one prompt.
Do I need After Effects to make these effects?
No. Claude Code builds them with free tools: HyperFrames for motion graphics, Blender for 3D and Robust Video Matting for cut-outs. You pay only for a Claude plan that includes Claude Code, from $20 a month.
Can Claude add effects to a video I already edited?
Yes. Give Claude Code the finished video, ask it for a transcript with a time on every word, then ask for the effects line by line. Effects that go behind you or around you also need a cut-out of you from every frame, which Claude can make with Robust Video Matting.
Do the free tools charge per video?
No. HyperFrames is Apache 2.0, and its README says there are no per-render fees or commercial-use thresholds. Blender and Robust Video Matting are free too. Your running cost is the Claude plan. Remotion, an alternative for teams that work in React, needs a paid company license once a for-profit company has more than 3 employees.
Sources
- HyperFrames on GitHub and the HyperFrames catalog
- Blender and the Blender Python API
- Robust Video Matting on GitHub
- Claude plans and pricing
- What is a text match cut
- Kinetic typography and parallax scrolling on Wikipedia
- W3C: Three Flashes or Below Threshold
- The Remotion license
- CapCut's Text behind Subject template